Thankful Thursday (Polar Vortex edition!)

I don't know about y'all but here in the South we got hit with some "crazy" weather. Ya know some ice and about an inch or more of snow :) It was so great to see the beauty of the snow but to be honest we don't do winter weather well in the south. I'm kinda ready for the temp to come back up but am thankful for that crunch of the snow too! 


Now if you are just joining me the Thankful Project is something I've been doing myself for over a year now. Basically I realized that I wasn't appreciating the blessings in life and I wanted my heart to see all that was surrounding me. This project is a daily deal for me. I look for something every day, big or small, that I don't typically appreciate. Sometimes it is something simple like hot water, and other days its more elaborate like a new tool/toy/clothes. 

I started this project as something I wanted to include you all in this year. I would love for you to join me in noticing more of the blessings poured out each day. I've chosen Instagram as my place to share my blessings and created the hashtag KTAthankful. You can join me anyway you like, social media or not! 


So real quickly here are some of my blessings this week! 
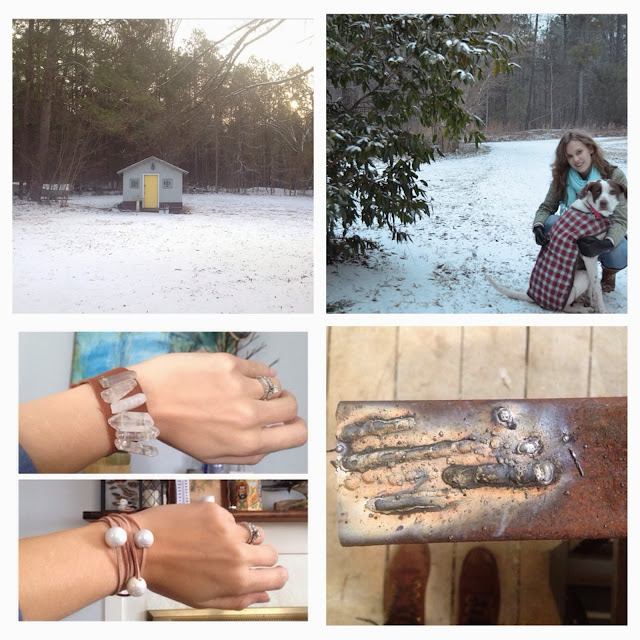
1. A beautifully snow covered yard and the cutest little studio any artist would be proud to own :) 
2. My favorite little puppy and our fun jackets playing in the snow. 
3. The chance to play with a new medium, and take another "business venture"!! (Come check out a new jewelry line I'm part of, Bohemian-ish
4. Breaking out the welder and teaching the hubs how it's done! 

This week was super fun, so much has happened and it was all so unique and made me realized how blessed I am to be a creative person! 

Come share what you where blessed with this week! Link up your Instagram, or any social media that you are sharing your version of the Thankful Project!! 


Work Bench (Look For Less #2)

It's time for another Look For Less challenge!! If you missed the first challenge head over HERE to check it out. If you are looking for my Wishful Wednesday ETSY list I posted that yesterday (Tuesday) so be sure to head back and check that out! 


(At the end of the post I will be sharing links to the other bloggers taking part of the challenge!)

I've been in need of a work bench in my studio and as always this challenge came at a perfect time to make me get the project done! 


My inspiration came from two different finds via ETSY. I love ETSY and wish I could have ordered both of these, but for a work bench I needed it to be a bit sturdier and much cheaper!! Both of these tables range between $250 and $500. They are most likely more than worth it but I couldn't justify that price tag not to mention I needed to modify them to make them fit my need. 


What I decided to do was combine the two designs and my goal was to spend less than $100, it is a work bench after all. What I used for this project was super simple.
Metal Task Force Saw Horses
2 pieces of 4ft x 4ft x 3/4in plywood
2 drills (1 for pre-drilling holes and 1 for screws)
Clamps
1in Screws
In total I spent $60 and just over 2 hours!! Not bad :)


First of all I cut my plywood to size. I used a 4ft x 3ft rectangle and  6in sides. Then I placed my first 4x3 piece of plywood on the ground and opened the saw horses and placed them on top. I marked their spots flipped them over and predrilled holes in to the bottom of the legs. Once all 8 legs had holes I lined the legs up with the marks and pre drilled and screwed the legs in to the plywood. Then flipped the entire thing over so the saw-horses are upside down and the table top is upright.


Then I clamped my 6in sides upright and predrilled and screwed the sides and top of the box together.
Now I have a 6inch shelf sitting below my ultra sturdy work bench. Despite my studio being organized and all my tools having a place when I work I spread out and make a mess!! So this shelf will help me keep my work area clean while still having tools in reach. Brilliant :)


And to add my final touches I sanded the whole baby down and painted the edges of the shelf to match the metal saw horse legs. I also added a few layers of poly to the unstained boards to give them a bit of protection. But lets be real it will probably get damaged and stained real quick, it is a workbench after all! 

Now my studio is officially finished! I've got loads of tools hung on the peg board, my paint storage cabinet, my faux pie safe is full of all kinds of goodies, and now I have a space big enough for me to work on how ever I want! And not to mention it can be easily moved around to open up the floor space when needed. 

If you enjoyed my look for less challenge the be sure to check out some of these other fabulous projects!
 Sewing Barefoot - Bathtub Caddy 
 Home Coming - Focal Wall Head Board
 Like A Saturday - Bottle Lamp
Life. Love. Larson - Faux Fur Stool
 Absolutely Arkansas - Salon Blowout At Home
Life On A Virginia Street - Large Scale Art & Frame

 photo gracie-sig_zps2d86285f.jpg